Photography skills can be improved by learning how shallow depth of field photography is done. You can achieve this by learning the different techniques and by understanding the various variables involved. For example, the depth of the field is determined by the f stop value and the distance between subject and camera. Charts can be used to calculate the f stops. You must also learn how to set shutter release for different depths.
Techniques to achieve shallow depth of field
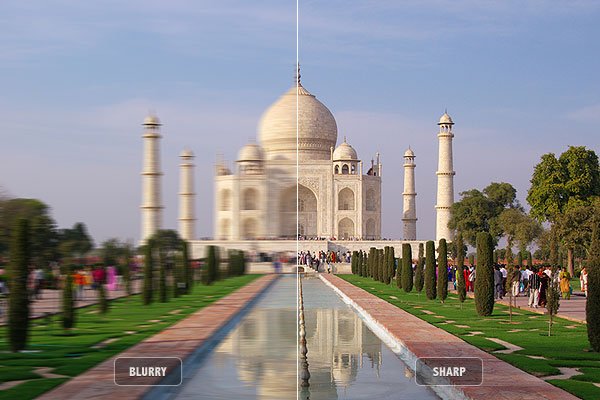
Shallow depth-of-field is an important technique to focus your camera's lens on a specific area of your subject. This technique helps to guide the viewer's eye to the most interesting parts of the image. It can also be used for blurring the background to create a feeling of depth.
A wide aperture can produce shallow depth of focus, while a smaller aperture will achieve shallower depth. A wider aperture allows for more light to enter the sensor. This results in less focus. While a wide aperture lens can be used for portrait photography it is also a good choice. It is easy to change the aperture and get shallow depth of field photos. A neutral density filter can be used if you don't need to alter the focal length of your lenses.
Another way to create shallow depth is to increase your distance from your subject and the camera. This effect can be achieved even if you don't have a wide-aperture lens. You can zoom in and move away to achieve the same effect. If you are taking a photo of a tree, for example, it is a good idea to stand 20 feet from the tree. Distance between the subject and the tree will create a soft background.
Charts for determining f-stop value
To achieve shallow depth-of-field photographs, you will need to increase the aperture. This will let more light pass through the lens, which is great for portraiture. These photographs are also called shallow depth-of-field photographs.
A depth of fields chart is useful to determine the proper depth of focus value. These charts will show you how much depth will be in the subject and at what f-stop. They can also printed out and laminated. It is crucial to choose the correct chart for your lens.
Generally, f-stops can be measured in increments up to one third. The smallest aperture size possible is f/8. While the largest is at f/16. The larger the aperture the more light it lets in to the lens. A lens with a large aperture size can capture more detail and contrast. Using a smaller aperture will minimize the amount of blurring or focusing in the photo, which will allow you to capture a shallower depth of field.
Distance between camera and subject
Deep field photography is made possible by the distance between the subject of the camera and the camera. As light passes through the lenses, the out of focus areas will change dramatically with changing apertures. Similarly, the distance between the camera and subject will determine how much out of focus area is in focus, and vice versa. Therefore, a bigger aperture will produce a greater DOF while a smaller aperture, will produce a lower DOF. To change the DOF, the photographer can adjust the aperture or move closer to their subject.
There are many factors that affect the distance between the camera lens and the subject. However, in general, the deeper depth of the field will depend on how close the subject is to the camera. A close-up portrait might have a background that is not in focus. However, a landscape photo may have trees and a stream in the foreground, while mountains far away will be in focus. This is because the distance between the camera and subject narrows as the rays of light travel through the lens. The DoF in the far distance is thus larger than the DoF in the near.
Focal length
A focal length is an important aspect of depth-of field photography. Focal length is not only important for the subject's distance, but it also has an impact on how sharp your photo will look. A longer lens will provide a shallower DOF than one with a shorter focal length.
You must determine the distance of the subject from the lens to calculate your DOF. This is also known as the depth of field ratio. The greater the distance between the subject and the camera, the wider the depth of the field. You can also increase DOF by opening or moving the aperture. However, it's important to remember that if the subject's distance is doubled, the focal length must also double. This means that the focal length is twice as important as the f/stop when it comes to defocusing.
A background that is longer in focal length will look bigger relative to the frontground. The background will appear more sharp if it is viewed from a narrower angle.
Focus distance
When taking depth of field photographs, the main subject should be in focus. This will naturally draw the viewer's attention. But the photographer must also decide the amount of background and foreground that should be included in the focus. The distance from the background to the foreground's closest point and the farthest is called the depth-of-field.
The greater the depth, the closer the subject is to focus. Different focus distances in depth-of field photos can make the subject appear closer to or farther away. You can blur the background by moving the focus distance.
FAQ
What is rule of thirds for photography?
The rule of thirds can be used to create beautiful compositions, without having to use complicated camera settings. It divides your image in nine equal parts, vertically and horizontally. This creates three main areas for your subject to appear. These are the top (upper left corner), middle (center) and bottom (lower right). These areas can be used as guidelines for positioning your subject within the frame.
The rule of Thirds helps you avoid placing crucial elements too close together. They may not be able to create a strong visual impact if they are too close together. They may lose focus if they're too far apart.
Should I get into photography as an interest?
Photographing is a great way to preserve memories and share them among friends and family. Photography also lets you learn more about the world around.
There are many resources online that will help you take better photos if you're interested in this topic.
Consider taking classes at your local community college or art school. This will allow you to network with other photographers who can give valuable feedback on your work.
Do I Need A Tripod?
This is a question everyone asks. The truth is that a tripod isn't always necessary, but it can come in handy.
It helps you keep your camera steady while taking pictures at slow shutter speeds. A tripod can make all the difference when you're photographing landscapes or other stationary subjects.
A tripod can also cause blurriness when you are photographing people or sports. What are the best ways to determine which situations you need a tripod for?
A tripod is useful for any situation where you want to photograph fast action or stationary subjects. Examples include:
-
Sports
-
People
-
Landscapes
-
Close-ups
-
Macro shots
If you're unsure whether you need a tripod, try this test. Look through the viewfinder with your camera steady. If blurred lines appear or you feel movement, you will definitely need a tripod.
If you don't see any blurring, you probably won't notice any improvement by adding a tripod.
Here are some tips for those who do decide to buy a tripod.
-
You should ensure that your tripod has smooth legs. This helps to prevent vibrations from shaking the camera.
-
A tripod is a good choice. Some tripods are made out of plastic and may not be very durable. You should opt for a steel tripod.
-
Consider purchasing a remote release. This lets you control your camera remotely. You can set it to fire the shutter once you press the button automatically.
-
Make sure to look for a tripod that rotates 360 degrees. This makes it easier for you to position your camera horizontally, or vertically.
-
Tripods are expensive. Expect to pay between $100-200. You'll still get a lot for your money.
-
Accessories like memory cards and filters should not be forgotten.
-
Before shopping online, be sure to visit your local shop. Many retailers offer shipping free of charge.
-
Read reviews to determine what customers think about a particular product.
-
Ask family members or friends to share similar products.
-
Visit forums and message boards to learn about customer experiences.
-
Find user reviews online.
-
Use websites like Amazon.com to compare prices and read customer feedback.
-
Browse photo galleries to get an idea of what photographers do with their tripods.
How do you get started in digital photography
You should first consider what kind of camera you want when you begin digital photography. There are many options: DSLRs (digital Single Lens Reflex Cameras), point-and–shoot compact cameras or camcorders. Each one has its advantages and disadvantages. DSLR cameras, however, are larger and heavier than most other types of cameras. Point-and-shoot cameras are smaller and lighter and often include automatic settings for certain situations. Camcorders offer excellent video recording capabilities, and may also have still photo shooting modes. Smartphones are lightweight, portable, and light. They offer excellent image quality, advanced features, such as GPS mapping, music playingback, and Internet browsing.
Once you've made a decision about the type and model of camera you want, then you must decide whether you want to buy it new or used. Cameras that have been used in recent years can often be found for a reasonable price. Because manufacturers invest large sums of money in developing new technology, new models tend to be more expensive.
Next, you'll need to buy lenses. Lenses play a key role in determining the quality of your photographs. They enable you to adjust the focal length of the lens so that you can zoom into the scene with no loss of focus. Some lenses have built-in flash units, while others require external flash units. A wide range of lenses is available from various brands, each offering unique characteristics.
Finally, you'll need to buy memory cards. Memory cards are used to store images taken with your camera. The size of your memory card will depend on the number of images it holds. It could store hundreds of thousands or even millions of pictures. Multiple memory cards will be required if your plan is to take lots of pictures.
Which is the best camera to use for beginners?
The best camera for beginners depends on your budget, needs, and skill level.
If you are looking to save money, then a point and shoot digital camera might be the best option. These cameras can be very versatile, but they offer excellent quality.
Digital Single Lens Reflex (DSLR) cameras can be equipped with interchangeable lenses that enable you to shoot different types. These lenses are usually more expensive than point-and shoots, but offer greater flexibility.
A beginner's kit for beginners is a good place to start. Everything you need, including a flash, tripod, memory card and camera body, will be included in the one-pack.
Also, don't forget about extra batteries!
Statistics
- There are people out there who will pick at flaws they can only see in 100% crops of your photos. (wikihow.com)
- This article received 13 testimonials, and 100% of readers who voted found it helpful, earning it our reader-approved status. (wikihow.com)
- The second easiest way to get blurry photos 100% of the time is to use a cheap filter on the front of your lens. (photographylife.com)
- Get 40% off Adobe Creative Cloud(opens in new tab) (creativebloq.com)
External Links
How To
How to capture pictures under low lighting conditions
Low-light Photography is when you take photos in dimly lit or dark environments. It requires special equipment and techniques. Controlling exposure, white balance, sharpness, and contrast are the main challenges. There are two types of low light photography: flash and ambient. Flash photography is best when there is enough light. But if there isn't enough natural light, then you'll have to use a flash. A flash might be necessary if you are photographing a subject indoors and outside. Shooting at night in the moonlight hours is a good alternative to using a flash. This will allow you to get nice shadows and colors. Another option to consider is shooting during twilight. Twilight happens when the sun has set but there is still daylight.
Long exposures may be something you want to explore. You can record images even after the shutter is closed for several minutes. The camera records only light falling on the sensor if it is kept closed. This light continues to fall onto a photo sensor throughout a prolonged exposure. However, because the shutter remained shut, no new light enters the lens. You will see very little movement as a result. To ensure a clear image, you should turn off all automatic settings such autofocus or exposure. Adjust the ISO setting before you start to shoot. An ISO setting of 200 gives you more flexibility to control how bright or dark your image looks. Once you are ready to click the shutter button, make sure it is fast. The shutter will close completely. Keep the shutter button pressed down until the last second. By holding down the shutter button, you prevent additional light from entering the camera. Once you take the shot, wait a while before you release the shutter. This allows your camera to process the picture. You can view your photos while you wait on the camera. Save them once you are satisfied with them.